Designed by Oratek in Switzerland
Overview
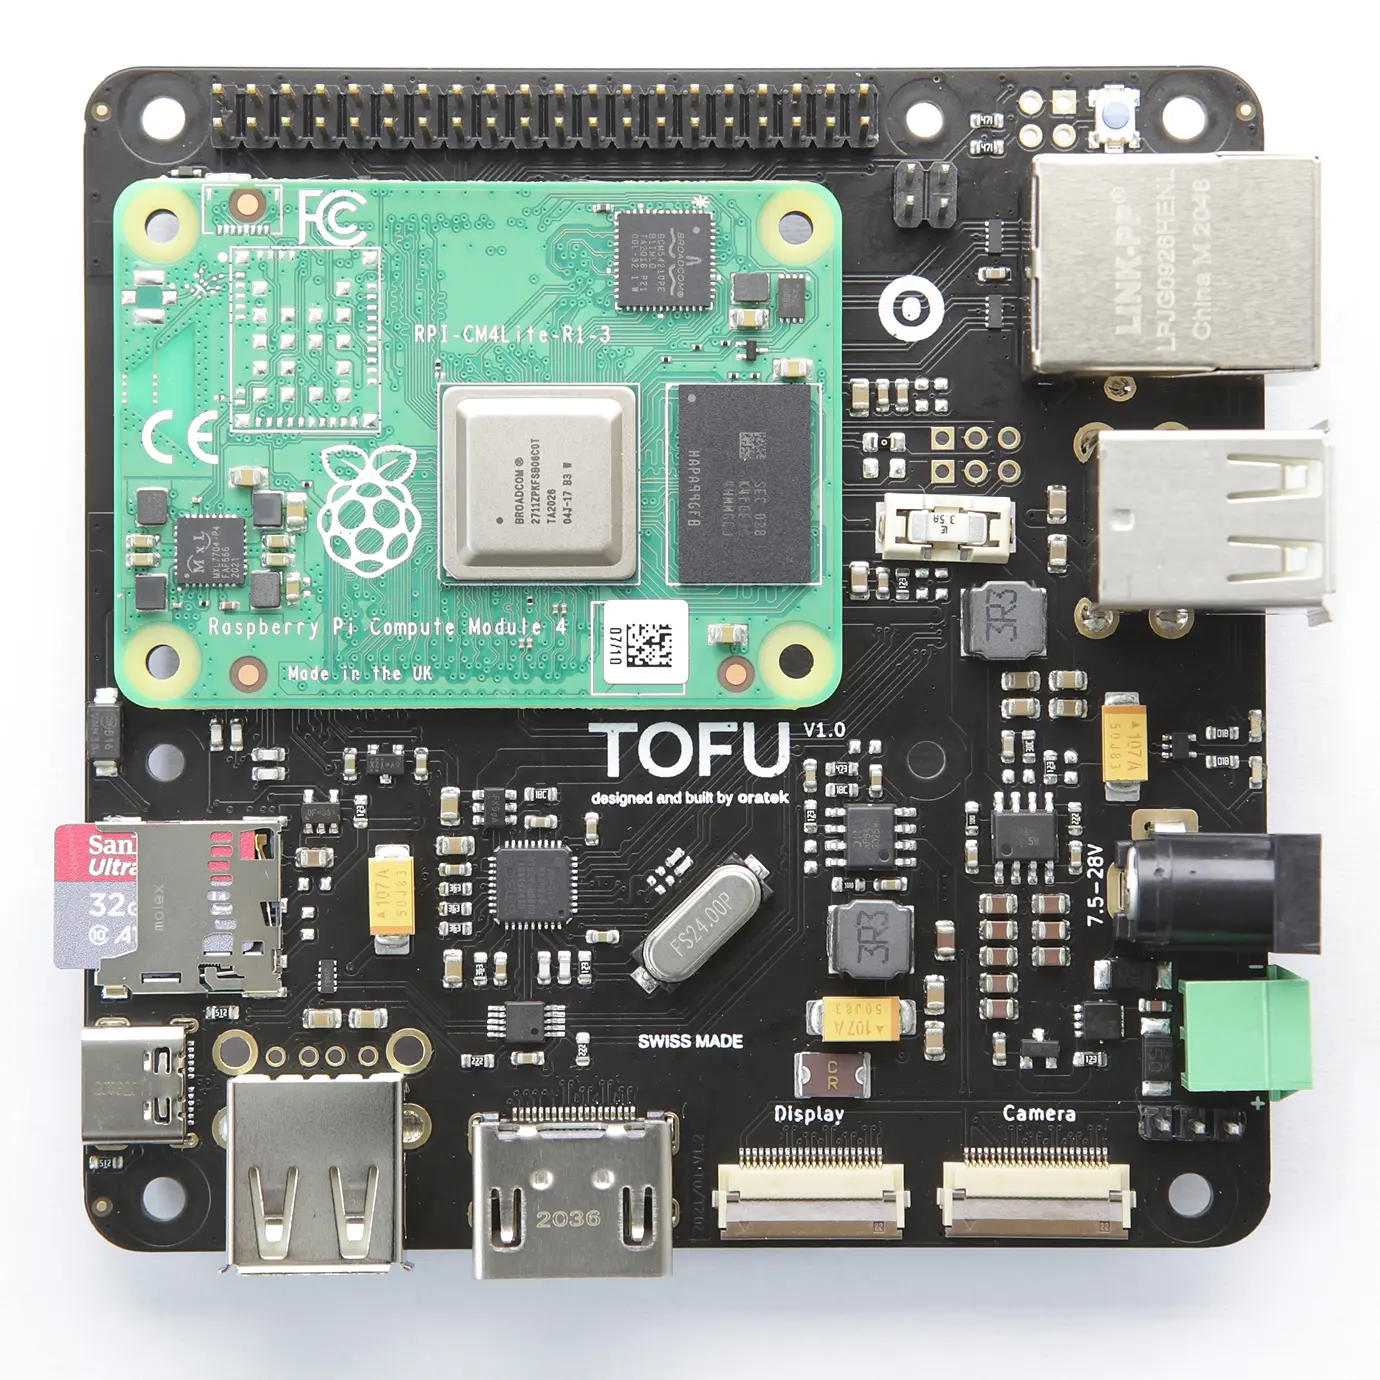
The TOFU board is a carrier board for use with Raspberry Pi Compute Module 4 (CM4). Inspired by the official CM4IO board, it is intended for industrial applications. With user friendly additions, it may also be used by enthusiasts looking for a compact yet complete solution to interface the many inputs and outputs of the single board computer.
Engineering Notice
The board has been updated to version V1.1 and V1.0 is no longer produced. V1.1 does not impact features, design or performance in any way but gives more design flexibility by moving away components placed underneath the Compute Module. All present and future shipments will be V1.1. The version number is found on the packaging and on the board itself.
V1.1 Changelog
Added
- UKCA logo
Changed
- UKCA logo
Removed
- SIM_SW 0R (R31, below CM4)
Features
The size of the board is 9x9cm and its main features are :
- Standard Raspberry Pi 40 pin GPIO header
- Gigabit Ethernet port with PoE through the official Raspberry Pi PoE HAT
- M.2 2242/3042 socket (key B) with micro SIM card holder. See compatibility list
- 3x USB-A ports
- Full size HDMI port
- Camera and display ports (newer 22pin version, flexible adapter cables can be purchased separately here)
- Two power inputs for industrial connectors (2.1mm barrel and standard 3.5mm terminal block)
- Large input voltage range, from 7.5 to 28V. Also available on 3x1 header pins for sharing to HATs requiring higher voltages (recommended power rating: >24W)
- Micro SD card slot. Only used for CM4Lite (no eMMC memory)
- USB-C port to use it as an OTG device and for programming purposes. May also be used to power the CM4, with power constraints if used with peripherals.
- Circuit protections added for safety reasons (ESD, over- and reverse-current protections)
- Standard Raspberry Pi, CM4 and 4 additional M3 mounting holes for design flexibility

Operating temperature
The CM4 is rated from -20°C to 85°C. All components on the TOFU board comply with this range. Apart from connectors, all electronic components are rated for -40°C or below.
Layout
.webp)
Additional information
Note: When powering the device through PoE or other power HATs (5V line of RPi header as power input), or with USB-C, a hissing noise may appear from the unused power supply. The fuse may be removed for silent operation in these cases.
Edit note: After feedback from our customers, it appears PoE and power HATs will in fact power on the m.2 connector. However, the output current is often limited to 2.5A on these boards. We recommend a higher current rating for proper operation of all peripherals.
Tested compatibility list
NVMe SSDs (M.2 2242)
- KingSpec NE 2242, 128GB
- Western Digital PC SN520, 128GB
- Transcend MTE452T, 128GB
M key NVMe SSD (through adapter)
- Western Digital Blue SN550, 256GB, M.2 2280
- Western Digital Black SN750, 1TB, M.2 2280
- Samsung 970 Pro, 512GB, M.2 2280
Wireless/LTE/GPS modules (M.2 3042)
- Huawei ME906s-158
- Huawei ME936
- Sierra Wireless AirPrime EM7345
- SIMCom SIM7600G-H
Technical files
Mechanical
Electrical
Setup
Board features
To fully utilize the board possibilities, both USB ports and NVMe interfaces have to be enabled.As indicated on the CM4IO board datasheet:
"The USB interface is disabled to save power by default on the CM4. To enable it you need to add the following to the config.txt file :"
dtoverlay=dwc2,dr_mode=host
NVMe support is also not enabled by default on Raspberry Pi OS. The command
sudo modprobe nvme-core
is needed, followed by a reboot to enable the NVMe kernel module. More information on NVMe can be found on Jeff Geerling's CM4 review.
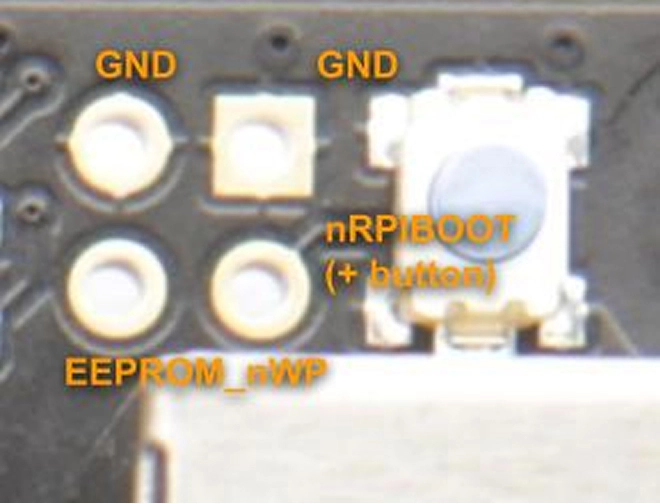
eMMC boot
To boot on eMMC, hold down the nRPIBOOT button while plugging the USB-C cable for flashing (no other power input). The USB cable will power the CM4 while it boots. You may release the button after having plugged the cable. Then, you need to run the rpiboot script. This can be done in two ways:
- If you have BalenaEtcher, open it. It will run the script in the background, and after a few seconds, your device will be recognized.
- Install rpiboot directly. For Linux/macOS, follow the instructions on their github page. For Windows, you can download the installer.
More information for flashing the eMMC can be found here.
Watchdog functions
The compute module behaves much like a Raspberry Pi 4. Thanks to this, one can use the same watchdog functions for reliability issues. You can have a look at diode.io for more information on how to use those. More information may also be found on this StackExchange thread.
SSD mounting
First, you need to partition the storage, following this tutorial from piramble. Notez que /dev/sda1 sera très probablement remplacé par /dev/nvme0n1.
Une autre possibilité de montage est disponible sur le site Web du Raspberry Pi, ici (avec un appareil formaté).
Un test de référence précis peut être effectué pour déterminer les performances de votre SSD en exécutant la commande de pibenchmarks.com/, où vous verrez d'excellents résultats sur le plateau TOFU dans Meilleurs scores (SBC).
sudo curl https://raw.githubusercontent.com/TheRemote/PiBenchmarks/master/Storage.sh | sudo bash
Cette commande doit être exécutée à l'emplacement du disque.
Démarrage du SSD NVMe
Le Raspberry Pi prend désormais en charge le démarrage par SSD NVMe, et la carte TOFU est le compagnon idéal pour cela ! Vous trouverez peut-être plus d'informations sur le Raspberry Pi documentation.
cartes réseau
Les cartes réseau M.2 utilisent souvent la ligne USB du connecteur comme interface. N'oubliez pas d'activer l'interface USB, comme indiqué ci-dessus.
Les cartes testées fonctionnent de manière native en utilisant Système d'exploitation Balena avec Network Manager et Modem Manager préinstallés. Il vous suffira de créer un fichier de configuration et il fonctionnera dès la sortie de la boîte (plus de détails).
Une autre méthode consiste à installer manuellement Network Manager et Modem Manager et à les configurer. Ceci n'est pas spécifique à la carte TOFU mais plus général à Linux. Un guide pour démarrer est disponible ici.
Ports pour appareil photo et écran
Sur la carte TOFU, les ports de caméra et d'affichage sont cam1 et disp1. Vous trouverez de l'aide pour les activer dans la documentation du Raspberry Pi (caméra et affichage). Vous pouvez par exemple télécharger le fichier »dt-blob-disp1-cam1.dts« en bas de page.
Vous devez ensuite compiler le fichier (cela affichera de nombreux avertissements qui peuvent être ignorés) :
sudo dtc -I dts -O dtb -o dt-blob-disp1-cam1.dtb dt-blob-disp1-cam1.dts
Installez ensuite le fichier dt-blob.bin :
sudo cp dt-blob-disp1-cam1.dtb /boot/dt-blob.bin
redémarrez, et vous devriez être prêt. Plus d'informations peuvent également être trouvées ici. Pour utiliser l'appareil photo, vous pouvez vous référer à ces guides sur logiciel libcamera.
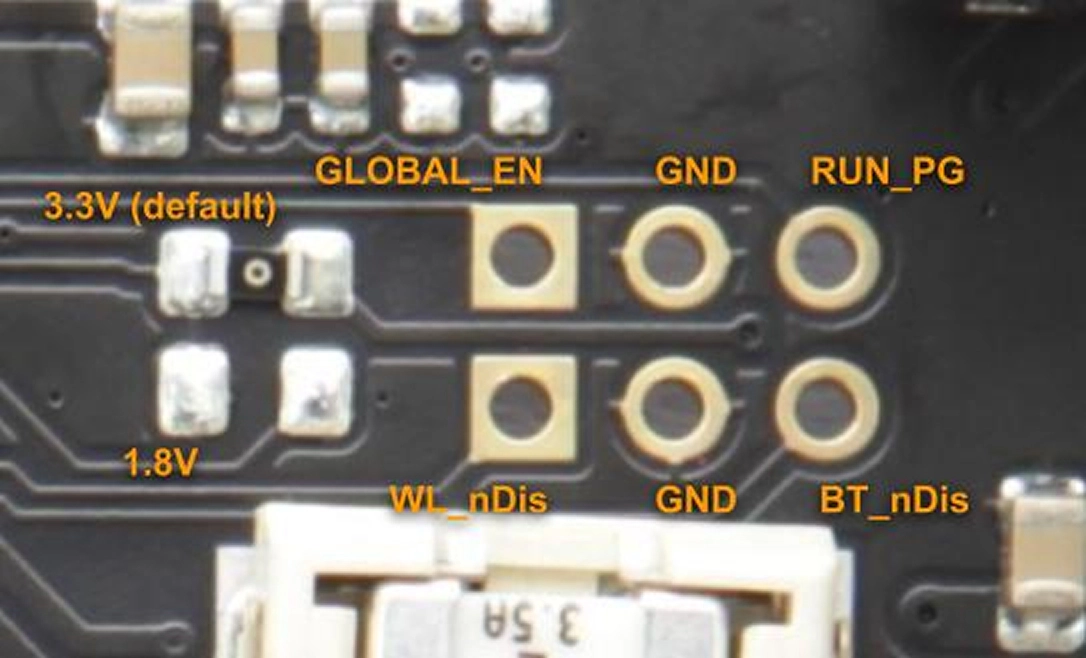
Configurations des broches
cartes réseau
Les cartes réseau M.2 utilisent souvent la ligne USB du connecteur comme interface. N'oubliez pas d'activer l'interface USB, comme indiqué ci-dessus.
Les cartes testées fonctionnent de manière native en utilisant Système d'exploitation Balena avec Network Manager et Modem Manager préinstallés. Il vous suffira de créer un fichier de configuration et il fonctionnera dès la sortie de la boîte (plus de détails).
Une autre méthode consiste à installer manuellement Network Manager et Modem Manager et à les configurer. Ceci n'est pas spécifique à la carte TOFU mais plus général à Linux. Un guide pour démarrer est disponible ici.
Ressources
- Fiche technique du module de calcul Raspberry Pi 4
- Fiche technique de la carte E/S du module de calcul Raspberry Pi 4
- Documentation générale sur le Raspberry Pi
Personnalisation
Oratek est une société d'ingénierie sur terre, donc toute personnalisation ou développement basé sur le TOFU n'est pas seulement une possibilité mais aussi une réalité. Au cours des dernières années, nous avons développé de nombreux développements personnalisés et nous sommes heureux de répondre à toutes les demandes.
Pour toute demande, veuillez nous contacter
Déclarations de conformité
Raspberry Pi est une marque déposée de la Raspberry Pi Foundation